JP Resources
A collection of tips and tricks, primarily related to CSS, Yomichan templates, and ShareX.
This page was inspired by Marv's resources page, which has a bunch of different but equally awesome resources. I highly recommend checking it out!
If you encounter any problems, have any questions, etc., feel free to contact
me on discord aquafina_water_bottle,
or submit an issue.
I exist on the TheMoeWay and Refold (Japanese) servers.
Master Project List
This contains the list of all my current projects that relate to learning Japanese.
-
jp-mining-note is a highly customizable Anki card template for studying Japanese, designed to be visually appealing and simple to use without sacrificing functionality. Easily paired with most automatic card creation workflows, this aims to make your experience with Anki as smooth as possible.
-
Local Audio Server for Yomichan
This Anki add-on runs a local server of which Yomichan can fetch audio files from, using a database containing over 200,000 unique expressions. With this setup, you are able to create Anki cards nearly instantaneously, and get word audio without a working internet connection.
-
All Anki note templates I can find
I catalogue all note templates I can possibly find (that isn't jp-mining-note, and made for learning Japanese) here.
-
This simply contains a Yomichan dictionary version of
JMdict (English)from the main website (from filesJMdict_eandJMdict_e_examp), compiled using yomichan-import. (Disclaimer: I did not make any of these tools.)This repository exists to simply give people a more up-to-date version of this dictionary, for people who don't want to compile the dictionary themselves. A more up-to-date version of JMdict usually provides better definitions and coverage compared to older versions, so I would recommend updating this dictionary every few months.
CSS (Yomichan)
How-To: Add Custom CSS In Yomichan
To add custom CSS in Yomichan, do the following:
- Head over to Yomichan settings (Yomichan extension marker -> cogwheel)
- Go to
Appearance→Configure custom CSS... - Add the CSS to the top section.
- Close the window.
Demo (click here)
Not selecting or copying furigana
If you want to select / copy the main word within Yomichan without copying the furigana, you can use the following CSS:
Note
The above is actually general enough to use for Anki cards itself, say with the following CSS:
Limiting the number of frequency lists
/* Only shows the first 2 frequency lists */
span.frequency-group-item:nth-child(n+3) {
  display: none;
}
Demo (click here)
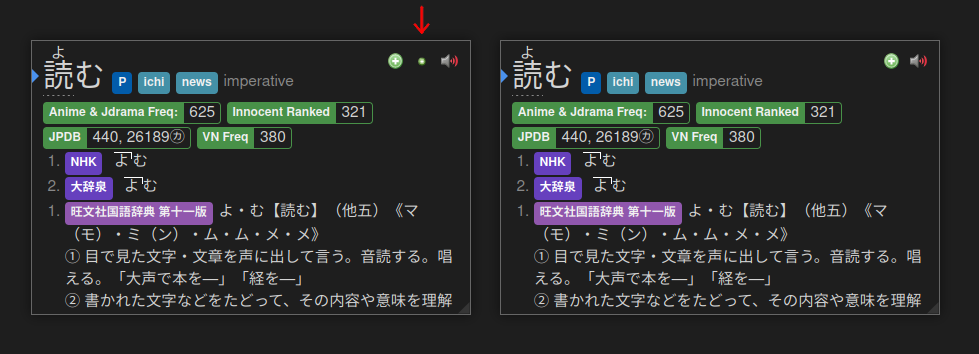
Limiting the number of pitch accent dictionaries
The following CSS displays only the first 2 pitch accent dictionaries:
/* Only shows the first 2 pitch accent dictionaries */
li.pronunciation-group:nth-child(n+3) {
  display: none;
}
Make the pitch accent dictionary text a bit grey by default, and to make specifically the "NHK" and "大辞泉" white (change these two to any dictionary you find to be of higher quality)
/* Greys out all pitch accent dictionary names */
/* Sets NHK and 大辞泉 pitch accent dictionaries to a white name */
.tag[data-category="pronunciation-dictionary"] {
  --tag-text-color: #c8bfdb;
}
.tag[data-details="大辞泉"], .tag[data-details="NHK"] {
  --tag-text-color: #FFFFFF;
}
Demo (click here)

Hide the dictionary, but allow it to be used by Anki
The default way to hide a dictionary is by disabling the dictionary
under Yomichan's Dictionaries section.
However, if you disable the dictionary, you cannot export it into Anki,
which is a problem if you are using a bilingual profile but you want to export
monolingual definitions.
Steps:
- Ensure that the dictionary is enabled in your Yomichan profile.
- Add the following CSS for the desired dictionaries (this has to be done for each individual dictionary):
Example CSS for JMdict (click here)
Demo (click here)
Hide bilingual definitions until hover
Add the following CSS for the desired dictionaries (this has to be done for each individual dictionary):
li.definition-item[data-dictionary='DICTIONARY'] .gloss-list {
  opacity: 0;
}
li.definition-item[data-dictionary='DICTIONARY']:hover .gloss-list {
  opacity: 1;
}
Example CSS for JMdict (click here)
Demo (click here)
Remove the "Add Reading" button
This removes the small green button to add the reading.
Demo (click here)
Coloring Dictionaries
Darius has some CSS here that uniquely colors popular dictionaries.
CSS (Other)
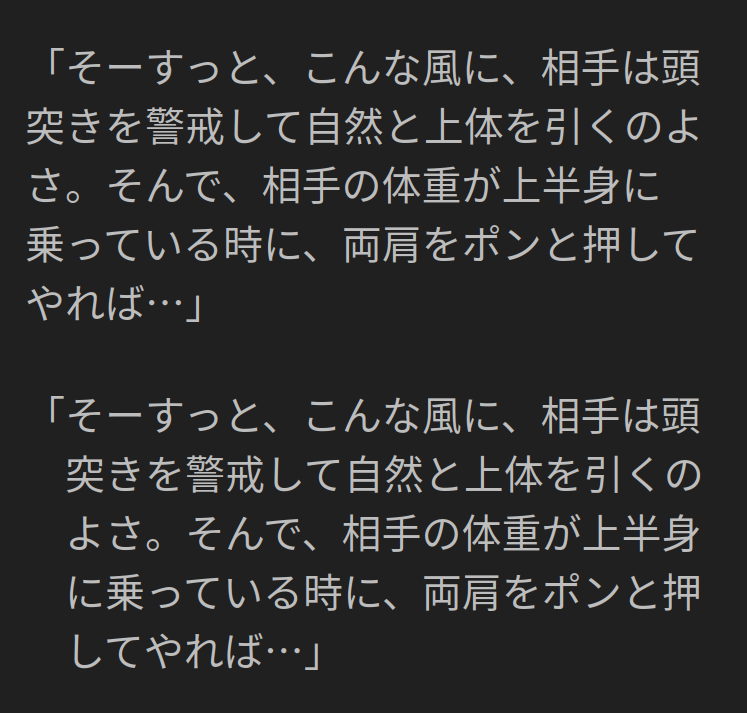
Ensuring 「」 properly quotes the text
On the example to the right, the first quote is the standard display without any custom CSS. The second quote is with the aforementioned CSS.
An example JSFiddle can be found here.
Changing the Japanese font on Discord
Note
Discord's codebase is always subject to change, so this method may not work in the future.
- Get BetterDiscord so you can use custom CSS.
- In Discord Settings →
Custom CSSsection, add the following:
Example CSS for Noto Sans (click here)
Discord's default CSS (click here)
:lang(ja), :lang(ja-JP) {
    --font-primary: "gg sans","Hiragino Sans","ヒラギノ角ゴ ProN W3","Hiragino Kaku Gothic ProN",メイリオ,Meiryo,Osaka,"MS PGothic","Noto Sans","Helvetica Neue",Helvetica,Arial,sans-serif;
    --font-display: "gg sans","Hiragino Sans","ヒラギノ角ゴ ProN W3","Hiragino Kaku Gothic ProN",メイリオ,Meiryo,Osaka,"MS PGothic","Noto Sans","Helvetica Neue",Helvetica,Arial,sans-serif;
}
Note
If you are using the browser version of Discord, you can also change the font with the Stylus extension. I personally don't use this, so I'll leave it to the user to figure out the settings. ;)
Changelog
22/12/01: ChangedWhitneytogg sansto match with Discord's new font22/12/05: Added--font-display, added missingNoto Sansto all the fonts
Yomichan Templates / Handlebars
Note
If you are using the jp-mining-note template, most things here will likely not be useful for you as the Yomichan templates that comes with the note already contains most of these features and more.
How-To: Edit Yomichan Fields
- Navigate to Yomichan Settings.
- Go to the
Ankisection. - Select
Anki card format....
How-To: Edit Yomichan Templates (Handlebars)
- Navigate to Yomichan Settings.
- Make sure that advanced settings are turned on (bottom left corner).
- Go to the
Ankisection - Select
Configure Anki card templates...
Demo (click here)
Grab only the first pitch accent dictionary
Adds the following Yomichan Fields:
{pitch-accents-single-dict}: Pitch accent in text (downstep) format{pitch-accent-graphs-single-dict}: Pitch accent in svg graph format{pitch-accent-positions-single-dict}: Pitch accent in positions (number) format
Template code (click here)
{{#*inline "pitch-accent-list-single-dict"}}
    {{~#if (op ">" pitchCount 1)~}}<ol>{{~/if~}}
    {{~#eachUpTo pitches 1~}}
        {{~#each pitches~}}
            {{~#if (op ">" ../../pitchCount 1)~}}<li>{{~/if~}}
                {{~> pitch-accent-item-disambiguation~}}
                {{~> pitch-accent-item format=../../format~}}
            {{~#if (op ">" ../../pitchCount 1)~}}</li>{{~/if~}}
        {{~/each~}}
    {{~else~}}
        No pitch accent data
    {{~/eachUpTo~}}
{{/inline}}

{{#*inline "pitch-accents-single-dict"}}
    {{~> pitch-accent-list-single-dict format='text'~}}
{{/inline}}

{{#*inline "pitch-accent-graphs-single-dict"}}
    {{~> pitch-accent-list-single-dict format='graph'~}}
{{/inline}}

{{#*inline "pitch-accent-positions-single-dict"}}
    {{~> pitch-accent-list-single-dict format='position'~}}
{{/inline}}
Modified version of the above for Anime Cards (click here)
{{#*inline "pitch-accent-list-single-dict"}}
    {{~#if (op ">" pitchCount 1)~}}{{~/if~}}
    {{~#eachUpTo pitches 1~}}
        {{~#each pitches~}}
            {{~#if (op ">" ../../pitchCount 1)~}}{{~/if~}}
                {{~> pitch-accent-item-disambiguation~}}
                {{~> pitch-accent-item format=../../format~}}
            {{~#if (op ">" ../../pitchCount 1)~}}{{~/if~}}
        {{~/each~}}
    {{~else~}}
    {{~/eachUpTo~}}
{{/inline}}

{{#*inline "pitch-accents-single-dict"}}
    {{~> pitch-accent-list-single-dict format='text'~}}
{{/inline}}

{{#*inline "pitch-accent-graphs-single-dict"}}
    {{~> pitch-accent-list-single-dict format='graph'~}}
{{/inline}}

{{#*inline "pitch-accent-positions-single-dict"}}
    {{#regexReplace "<(.|\n)*?>" ""}}{{~> pitch-accent-list-single-dict format='position'~}}{{/regexReplace}}
{{/inline}}
(Thanks An#7416 for the template code. Original message on TMW server).
Export only the selected text (only if text is selected)
Adds:
{selection-text-or-glossary}
Allows you to export only a section of a glossary by highlighting over it, and uses the glossary by default if you don't have anything highlighted.
Template code (click here)
Note
Related Github issue.
Grab only the first dictionary
Adds:
{glossary-first}
The following grabs the first dictionary (including every definition within said dictionary).
For further customization on how the first dictionary is selected (say, for automatic bilingual / monolingual separation), see the handlebars code used by jp-mining-note here.
Template code (click here)
{{~#*inline "glossary-first"~}}

    {{~#scope~}}

        {{~#set "first-dictionary" null}}{{/set~}}

        {{~#each definition.definitions~}}
            {{~#if (op "===" null (get "first-dictionary"))~}}
                {{~#set "first-dictionary" dictionary~}}{{~/set~}}
            {{~/if~}}
        {{~/each~}}

        {{~#if (op "!==" null (get "first-dictionary"))~}}
            <div style="text-align: left;"><ol>
            {{~#each definition.definitions~}}
                {{~#if (op "===" dictionary (get "first-dictionary"))~}}
                    <li>{{~> glossary-single . brief=../brief noDictionaryTag=../noDictionaryTag ~}}</li>
                {{~/if~}}
            {{~/each~}}
            </ol></div>
        {{~/if~}}

    {{~/scope~}}

{{~/inline~}}
Automatically highlight the tested word within the sentence upon card creation
Option 2: Bold + Styling (recommended)
Yomichan Fields:
Anki Note CSS (the Styling page under the editing card templates page):
If your card template is formatted like
<div class="sentence">{{ Sentence }}</div>:
Option 3: Custom div
Yomichan Fields:
Anki Note CSS:
Note
I personally prefer using Option 2 (bold + styling) over a custom div because it makes editing the note easier. For example, if you want to edit the highlighted region, you only have to bold the desired region (say, with ctrl+b) instead of having to edit the raw HTML of the field (say, with ctrl+shift+x).
See also: How to automatically highlight the targetted word within the sentence for already existing cards.
Plain-Style Sentence Furigana
Adds:
{sentence-bolded-furigana-plain}
This does the following:
- Generates plain style furigana on the sentence (e.g. 「 日本語[にほんご]」
- Bolds the added word
To use this in Anki, add furigana: in front of the field within the template code.
For example, if your field is SentenceReading, use {{furigana:SentenceReading}}.
Template code (click here)
{{#*inline "sentence-bolded-furigana-plain"}}
    {{~#if definition.cloze~}}

        {{~#regexReplace "(<span class=\"term\">)|(</span>)" "" "g"~}}
        {{~#regexReplace "<ruby>(.+?)<rt>(.+?)</rt></ruby>" " $1[$2]" "g"~}}

            {{~#if (hasMedia "textFurigana" definition.cloze.prefix)~}}
                {{~#getMedia "textFurigana" definition.cloze.prefix escape=false}}{{/getMedia~}}
            {{~else~}}
                {{~definition.cloze.prefix~}}
            {{~/if~}}

            <b>
            {{~#if (hasMedia "textFurigana" definition.cloze.body)~}}
                {{~#getMedia "textFurigana" definition.cloze.body escape=false}}{{/getMedia~}}
            {{~else~}}
                {{~definition.cloze.body~}}
            {{~/if~}}
            </b>

            {{~#if (hasMedia "textFurigana" definition.cloze.suffix)~}}
                {{~#getMedia "textFurigana" definition.cloze.suffix escape=false}}{{/getMedia~}}
            {{~else~}}
                {{~definition.cloze.suffix~}}
            {{~/if~}}

        {{~/regexReplace~}}
        {{~/regexReplace~}}

    {{~/if~}}
{{/inline}}
Thanks to Skillesss: for the base code and DaNautics#8833 for finding the above + removing the span classes
Comparisons to alternatives (click here)
-
AJT Furigana can auto-generate furigana on card add and can add furigana to any text within a field even after a card add. However, generating furigana cannot be done within this addon on Android, as this is a PC add-on.
Nonetheless, I recommend keeping AJT Furigana so furigana can be generated even after editing the sentence field.
-
The
{furigana}marker provided by default in Yomichan does not generate plain style furigana, which makes editing furigana more difficult in Anki.
Further Reading
Official documentation om Yomichan's templates:
Example template code can be found here:
-
Markers for individual dictionaries: here
- This has certain extended capabilities over my template code, such as removing the first line.
-
Old template code for this note (NO LONGER USED / MAINTAINED): here
ShareX Scripts
Many people have already documented how to setup your ShareX to work with Anki, such as:
- stegatxins0 (recommended)
- Anime Cards
Instead of re-telling the steps they have already showed,
I present alternative ShareX scripts
(the long one-liner to paste within the Actions argument section)
for stegatxins0's guide.
The following scripts have the following changes:
- They all work with jp-mining-note by default.
- They have been rewritten so it can be presented in human-readable format right below the one-liner.
- The one-liners can be re-compiled from the source code at your own discretion (by building the documentation). All the powershell source code can be found here.
Screenshot and Clipboard Hotkey
Features
- Adds the selected image to the note. This image is automatically shrunk (within the field viewer only, if you are using Anki versions 2.1.50+).
- Adds a tag to the note. The tag is exactly the window name of the current application.
- Sets the
AdditionalNotesto the current clipboard. I use this for copying/pasting context (the lines surrounding the sentence).
How-To
Follow the steps for setting up the
screenshot hotkey,
and use this script in place of step 8's argument.
ShareX Script (click here)
-NoProfile -Command "function Run-Json { param( $json_map ); $json = $json_map | ConvertTo-Json -Depth 5; $data = Invoke-RestMethod -Uri http://127.0.0.1:8765 -Method Post -ContentType 'application/json; charset=UTF-8' -Body $json; return $data; }; $clipboard = (Get-Clipboard | where{$_ -ne \"\"}) -join \"<br>\"; $media_name = '$input' | Split-Path -leaf; $added_notes = Run-Json @{ action = 'findNotes'; version = 6; params = @{ query = 'added:1'; } }; $sorted_list = $added_notes.result | Sort-Object -Descending {[Long]$_}; $curr_note_id = $sorted_list[0]; $curr_note_data = Run-Json @{ action = 'notesInfo'; version = 6; params = @{ notes = @($curr_note_id); } }; $curr_note_sent = $curr_note_data.result.fields.Sentence.value; $result_clipboard = $clipboard; if ($curr_note_sent -match '<b>(?<bolded>.+)</b>') { $bolded = $matches['bolded']; $result_clipboard = $clipboard.replace($bolded, \"<b>$bolded</b>\"); }; Run-Json @{ action = 'updateNoteFields'; version = 6; params = @{ note = @{ id = $curr_note_id; fields = @{ Picture = \"<img data-editor-shrink=`\"true`\" src=`\"$media_name`\">\"; AdditionalNotes = $result_clipboard; } } } }; if ($media_name -match '(?<tag>.+)_.*') { $tag = $matches['tag']; } Run-Json @{ action = 'addTags'; version = 6; params = @{ notes = @($curr_note_id); tags = $tag; } };"
Original ShareX Code (click here)
# (common begin)

function Run-Json {
    param( $json_map );

    $json = $json_map | ConvertTo-Json -Depth 5;
    $data = Invoke-RestMethod -Uri http://127.0.0.1:8765 -Method Post -ContentType `
        'application/json; charset=UTF-8' -Body $json;

    return $data;
};

# (common end)


$clipboard = (Get-Clipboard | where{$_ -ne ""}) -join "<br>";

# gets only the file name
$media_name = '$input' | Split-Path -leaf;

$added_notes = Run-Json @{
    action = 'findNotes';
    version = 6;
    params = @{
        query = 'added:1';
    }
};

$sorted_list = $added_notes.result | Sort-Object -Descending {[Long]$_};

$curr_note_id = $sorted_list[0];


# attempts to bold the found word within the clipboard
$curr_note_data = Run-Json @{
    action = 'notesInfo';
    version = 6;
    params = @{
        notes = @($curr_note_id);
    }
};
$curr_note_sent = $curr_note_data.result.fields.Sentence.value;
$result_clipboard = $clipboard;
if ($curr_note_sent -match '<b>(?<bolded>.+)</b>') {
    $bolded = $matches['bolded'];
    # may not replace anything
    $result_clipboard = $clipboard.replace($bolded, "<b>$bolded</b>");
};


Run-Json @{
    action = 'updateNoteFields';
    version = 6;
    params = @{
        note = @{
            id = $curr_note_id;
            fields = @{
                Picture = "<img data-editor-shrink=`"true`" src=`"$media_name`">";
                AdditionalNotes = $result_clipboard;
            }
        }
    }
};

if ($media_name -match '(?<tag>.+)_.*') {
    $tag = $matches['tag'];
}

Run-Json @{
    action = 'addTags';
    version = 6;
    params = @{
        notes = @($curr_note_id);
        tags = $tag;
    }
};
Screenshot (only) Hotkey
This is the same as the above, but without setting the AdditionalNotes field to the current clipboard.
ShareX Script (click here)
-NoProfile -Command "function Run-Json { param( $json_map ); $json = $json_map | ConvertTo-Json -Depth 5; $data = Invoke-RestMethod -Uri http://127.0.0.1:8765 -Method Post -ContentType 'application/json; charset=UTF-8' -Body $json; return $data; }; $media_name = '$input' | Split-Path -leaf; $added_notes = Run-Json @{ action = 'findNotes'; version = 6; params = @{ query = 'added:1'; } }; $sorted_list = $added_notes.result | Sort-Object -Descending {[Long]$_}; $curr_note_id = $sorted_list[0]; Run-Json @{ action = 'updateNoteFields'; version = 6; params = @{ note = @{ id = $curr_note_id; fields = @{ Picture = \"<img data-editor-shrink=`\"true`\" src=`\"$media_name`\">\"; } } } }; if ($media_name -match '(?<tag>.+)_.*') { $tag = $matches['tag'] } Run-Json @{ action = 'addTags'; version = 6; params = @{ notes = @($curr_note_id); tags = $tag; } };"
Original ShareX Code (click here)
# (common begin)

function Run-Json {
    param( $json_map );

    $json = $json_map | ConvertTo-Json -Depth 5;
    $data = Invoke-RestMethod -Uri http://127.0.0.1:8765 -Method Post -ContentType `
        'application/json; charset=UTF-8' -Body $json;

    return $data;
};

# (common end)


# gets only the file name
$media_name = '$input' | Split-Path -leaf;

$added_notes = Run-Json @{
    action = 'findNotes';
    version = 6;
    params = @{
        query = 'added:1';
    }
};

$sorted_list = $added_notes.result | Sort-Object -Descending {[Long]$_};

$curr_note_id = $sorted_list[0];


Run-Json @{
    action = 'updateNoteFields';
    version = 6;
    params = @{
        note = @{
            id = $curr_note_id;
            fields = @{
                Picture = "<img data-editor-shrink=`"true`" src=`"$media_name`">";
            }
        }
    }
};

if ($media_name -match '(?<tag>.+)_.*') {
    $tag = $matches['tag']
}

Run-Json @{
    action = 'addTags';
    version = 6;
    params = @{
        notes = @($curr_note_id);
        tags = $tag;
    }
};
Audio Hotkey
This script works exactly the same as stegatxins0's version, except rewritten in a more readable format. If you already have the audio hotkey setup, there is no reason to change the old script.
To use this, follow the steps for setting up the
audio hotkey,
and use this script in place of step 14's Argument.
ShareX Script (click here)
-NoProfile -Command "function Run-Json { param( $json_map ); $json = $json_map | ConvertTo-Json -Depth 5; $data = Invoke-RestMethod -Uri http://127.0.0.1:8765 -Method Post -ContentType 'application/json; charset=UTF-8' -Body $json; return $data; }; $media_name = '$input' | Split-Path -leaf; $added_notes = Run-Json @{ action = 'findNotes'; version = 6; params = @{ query = 'added:1'; } }; $sorted_list = $added_notes.result | Sort-Object -Descending {[Long]$_}; $curr_note_id = $sorted_list[0]; Run-Json @{ action = 'updateNoteFields'; version = 6; params = @{ note = @{ id = $curr_note_id; fields = @{ SentenceAudio = \"[sound:$media_name]\"; } } } };"
Original ShareX Code (click here)
# (common begin)

function Run-Json {
    param( $json_map );

    $json = $json_map | ConvertTo-Json -Depth 5;
    $data = Invoke-RestMethod -Uri http://127.0.0.1:8765 -Method Post -ContentType `
        'application/json; charset=UTF-8' -Body $json;

    return $data;
};

# (common end)


# gets only the file name
$media_name = '$input' | Split-Path -leaf;

$added_notes = Run-Json @{
    action = 'findNotes';
    version = 6;
    params = @{
        query = 'added:1';
    }
};

$sorted_list = $added_notes.result | Sort-Object -Descending {[Long]$_};

$curr_note_id = $sorted_list[0];


Run-Json @{
    action = 'updateNoteFields';
    version = 6;
    params = @{
        note = @{
            id = $curr_note_id;
            fields = @{
                SentenceAudio = "[sound:$media_name]";
            }
        }
    }
};
Anki Scripts
These are a set of scripts that may help you to prevent doing repetitive actions when adding notes.
Unlike the above, these scripts are not meant to be used with audio or picture files. Rather, they are stand-alone scripts that modify the most recent cards added.
These scripts are written in two formats:
one that works automatically with your usual ShareX setup,
and one in Python for cross-platform portability.
Warning
Do NOT view the card in the card browser when running any script, because if you do, the affected fields may not update. Close the card browser before running the scripts.
However, you do not need to worry about this
if you are running the python script with the --enable-gui-browse flag.
How-To: Running with ShareX
As shown above, ShareX has the ability to run custom user scripts. However, for ShareX to only run the script and do nothing else, the hotkey must be configured with steps shown below.
Warning
Depending on the popularity of these scripts, the ShareX versions may be deprecated in the future in favor of the easier to use/write/maintain Python versions. The only downside of using the Python script is that the user must have Python installed.
Steps
(TODO video)
- Under the main window, go to
Hotkey Settings, and add a new hotkey. - Click on the settings icon (of the newly added hotkey).
- In the
Tasktab (to the left):- Set:
TasktoScreen capture→Capture active window - Check
Override After Capture Tasks() - Under
After Capture, un-check everything, and check the following:Save Image to FilePerform ActionsDelete Locally
- Set:
- In the
Actionstab (to the left):- Check
Override Actions() - Uncheck all existing actions.
- Add a new action by clicking on
Add. - Set the following values of the action:
- File Path:
C:\Windows\System32\WindowsPowerShell\v1.0\powershell.exe - Argument: (the text in
Sharex Scriptfor the script you want to run)
- File Path:
- Check
Note
If you are adding multiple scripts with ShareX, instead of re-doing all of the
steps above, you can instead duplicate the keybind,
and simply set the Argument of the action to a different script.
Explanation
The reason that the After Capture settings include Save Image to File
and Delete Locally is because without those settings, the Perform Actions
section doesn't appear to run.
Fortunately, the combination of Save Image to File
and Delete Locally means the hotkey does the following:
- Saves the image file
- Runs the custom script
- Deletes the image file
In other words, the image file is only temporarily created, and then deleted immediately after running the script. This effectively means that ShareX is only running the script whenever the keybind is used.
How-To: Running with Python
Warning
If you use the Python script as is within the repository without copying it to a different directory, this script will be updated every time you update the repository.
It's always good practice to not blindly run people's code on your computer. Make sure you trust the code, and double check after update!
If you don't want to use ShareX, or you are not using Windows, you can simply run a python script with command line.
# Your python version should be 3.8 or higher.
# It may work for lower python versions, but I make no guarantee.
python3 /path/to/jp-mining-note/tools/hotkey.py -f FUNCTION_NAME
Examples (click here)
If you want to use these as keybinds, I will leave it up to you to determine how to do that (as there are too many different setups and programs that people can use to create keybinds). However, some tips for ShareX and AutoKey are given below.
Instructions for running Python scripts in ShareX
If you want, you can even use the Python scripts with ShareX, so long as you have Python installed. To use Python with ShareX, follow all the steps (shown above), until you set the action values.
- The command should be the
DRIVE:\PATH\TO\python.exe(instead of the path topowershell.exe). - The argument should be
DRIVE:\PATH\TO\jp-mining-note\tools\hotkey.py -f FUNCTION_NAME(instead of the large one-liner.)
Instructions for AutoKey (Not AutoHotKey)
If you are using AutoKey for Linux, it should be possible to do the following instead:
-
Go to:
Settings
→Configure AutoKey
→Script Engine
→User Module file
→ (add thejp-mining-note/toolsdirectory) -
Create a
scripttype hotkey, -
Within the script, run any function thusly:
Example:
Example with GUI:
Update Sentence with Clipboard
Function Name:
update_sentence
This script updates the sentence with the current clipboard (while preserving the bolded word),
and removes the SentenceReading field (of the newest note added).
This script is useful when Yomichan's parsed sentence does not match the recorded audio. This is also useful for when Yomichan's word parser doesn't match the word itself (steps shown below).
Note
After running this script, you must manually generate the SentenceReading field
if you want the furigana reading.
Of course, this can be done in bulk at any point,
as shown here.
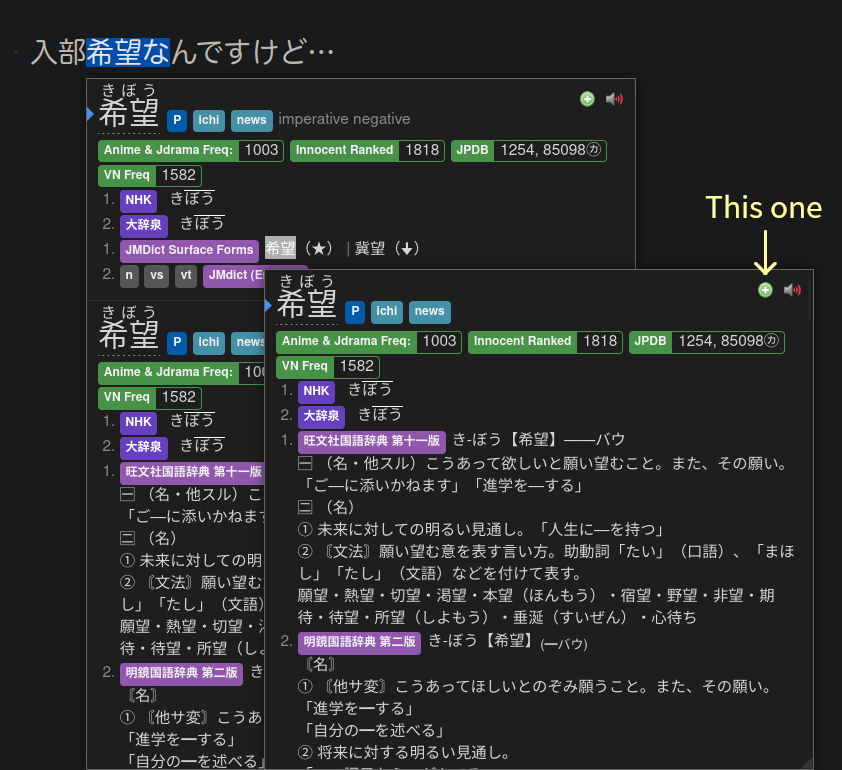
How-To: Fix incorrectly-bolded words (click here)
As an example, The target word 希望 in the sentence 「入部希望なんですけど…」 will be parsed by Yomichan as the following:
Within the original popup, you can add two versions of the word by default:
- The one with JMdict only. Adding this word will add the sentence with incorrect bolding.
- The one with everything else other than JMdict. Adding this word will have the correct bold, but will be missing some definitions.
To add the above sentence that solves both problems (no weird bold, and contains all definitions), do NOT add the word within the sentence. Instead, do the following:
-
Highlight over the header word itself (or the word in the orthographic forms dictionary), and add that word instead.
Demo (click here)
-
Copy the desired sentence.
-
Run this script.
Note
It is assumed that you have multiple popups enabled.
How the bolded word is preserved (click here)
The bolded word is preserved if the exact content within the bolded word is found within the clipboard, which should be almost always the case.
For example, assume the added sentence is the following:
As long as the clipboard contains the word 「偽者」, then the bold is preserved. For example, the following clipboard contents will preserve the bold:
ShareX Script (click here)
-NoProfile -Command "function Run-Json { param( $json_map ); $json = $json_map | ConvertTo-Json -Depth 5; $data = Invoke-RestMethod -Uri http://127.0.0.1:8765 -Method Post -ContentType 'application/json; charset=UTF-8' -Body $json; return $data; }; $clipboard = (Get-Clipboard | where{$_ -ne ''}) -join ''; $added_notes = Run-Json @{ action = 'findNotes'; version = 6; params = @{ query = 'added:1'; } }; $sorted_list = $added_notes.result | Sort-Object -Descending {[Long]$_}; $curr_note_id = $sorted_list[0]; $curr_note_data = Run-Json @{ action = 'notesInfo'; version = 6; params = @{ notes = @($curr_note_id); } }; $curr_note_sent = $curr_note_data.result.fields.Sentence.value; $result_sent = ''; if ($curr_note_sent -match '<b>(?<bolded>.+)</b>') { $bolded = $matches['bolded']; $result_sent = $clipboard.replace($bolded, \"<b>$bolded</b>\"); } else { $result_sent = $clipboard; }; Run-Json @{ action = 'updateNoteFields'; version = 6; params = @{ note = @{ id = $curr_note_id; fields = @{ Sentence = $result_sent; SentenceReading = ''; } } } };"
Original ShareX Code (click here)
# (common begin)

function Run-Json {
    param( $json_map );

    $json = $json_map | ConvertTo-Json -Depth 5;
    $data = Invoke-RestMethod -Uri http://127.0.0.1:8765 -Method Post -ContentType `
        'application/json; charset=UTF-8' -Body $json;

    return $data;
};

# (common end)


$clipboard = (Get-Clipboard | where{$_ -ne ''}) -join '';

$added_notes = Run-Json @{
    action = 'findNotes';
    version = 6;
    params = @{
        query = 'added:1';
    }
};

$sorted_list = $added_notes.result | Sort-Object -Descending {[Long]$_};

$curr_note_id = $sorted_list[0];

$curr_note_data = Run-Json @{
    action = 'notesInfo';
    version = 6;
    params = @{
        notes = @($curr_note_id);
    }
};

$curr_note_sent = $curr_note_data.result.fields.Sentence.value;
$result_sent = '';

if ($curr_note_sent -match '<b>(?<bolded>.+)</b>') {
    $bolded = $matches['bolded'];
    # may not replace anything
    $result_sent = $clipboard.replace($bolded, "<b>$bolded</b>");
} else {
    # default
    $result_sent = $clipboard;
};


# updates current card with result_sent
Run-Json @{
    action = 'updateNoteFields';
    version = 6;
    params = @{
        note = @{
            id = $curr_note_id;
            fields = @{
                Sentence = $result_sent;
                SentenceReading = '';
            }
        }
    }
};
Update AdditionalNotes with Clipboard
Function Name:
update_additional_notes
This script does the exact same thing as the above script, but with
AdditionalNotes instead of Sentence.
The tested word, if found, is also automatically highlighted.
This is useful to copy/paste context for the sentence (the surrounding lines around the sentence).
ShareX Script (click here)
-NoProfile -Command "function Run-Json { param( $json_map ); $json = $json_map | ConvertTo-Json -Depth 5; $data = Invoke-RestMethod -Uri http://127.0.0.1:8765 -Method Post -ContentType 'application/json; charset=UTF-8' -Body $json; return $data; }; $clipboard = (Get-Clipboard | where{$_ -ne \"\"}) -join \"<br>\"; $added_notes = Run-Json @{ action = 'findNotes'; version = 6; params = @{ query = 'added:1'; } }; $sorted_list = $added_notes.result | Sort-Object -Descending {[Long]$_}; $curr_note_id = $sorted_list[0]; $curr_note_data = Run-Json @{ action = 'notesInfo'; version = 6; params = @{ notes = @($curr_note_id); } }; $curr_note_sent = $curr_note_data.result.fields.Sentence.value; $result_sent = ''; if ($curr_note_sent -match '<b>(?<bolded>.+)</b>') { $bolded = $matches['bolded']; $result_sent = $clipboard.replace($bolded, \"<b>$bolded</b>\"); } else { $result_sent = $clipboard; }; Run-Json @{ action = 'updateNoteFields'; version = 6; params = @{ note = @{ id = $curr_note_id; fields = @{ AdditionalNotes = $result_sent; } } } };"
Original ShareX Code (click here)
# (common begin)

function Run-Json {
    param( $json_map );

    $json = $json_map | ConvertTo-Json -Depth 5;
    $data = Invoke-RestMethod -Uri http://127.0.0.1:8765 -Method Post -ContentType `
        'application/json; charset=UTF-8' -Body $json;

    return $data;
};

# (common end)


$clipboard = (Get-Clipboard | where{$_ -ne ""}) -join "<br>";

$added_notes = Run-Json @{
    action = 'findNotes';
    version = 6;
    params = @{
        query = 'added:1';
    }
};

$sorted_list = $added_notes.result | Sort-Object -Descending {[Long]$_};

$curr_note_id = $sorted_list[0];

$curr_note_data = Run-Json @{
    action = 'notesInfo';
    version = 6;
    params = @{
        notes = @($curr_note_id);
    }
};

$curr_note_sent = $curr_note_data.result.fields.Sentence.value;
$result_sent = '';

if ($curr_note_sent -match '<b>(?<bolded>.+)</b>') {
    $bolded = $matches['bolded'];
    # may not replace anything
    $result_sent = $clipboard.replace($bolded, "<b>$bolded</b>");
} else {
    # default
    $result_sent = $clipboard;
};


# updates current card with result_sent
Run-Json @{
    action = 'updateNoteFields';
    version = 6;
    params = @{
        note = @{
            id = $curr_note_id;
            fields = @{
                AdditionalNotes = $result_sent;
            }
        }
    }
};
Copy from Previous Card
Function Name:
copy_from_previous
This script does the following:
- Set the
AdditionalNotesandPicturefield of the newest card to the previous (second-newest) card's fields. - Copies all the tags of the previous card.
This is useful for when you are adding more than one sentence with the same text box of a visual novel, as it prevents you from having to run the screenshot hotkey.
How to use
- Create a card from the first unknown word in the text box.
- Create a card from the second unknown word in the text box.
- Run this script.
ShareX Script (click here)
-NoProfile -Command "function Run-Json { param( $json_map ); $json = $json_map | ConvertTo-Json -Depth 5; $data = Invoke-RestMethod -Uri http://127.0.0.1:8765 -Method Post -ContentType 'application/json; charset=UTF-8' -Body $json; return $data; }; $added_notes = Run-Json @{ action = 'findNotes'; version = 6; params = @{ query = 'added:1'; } }; $sorted_list = $added_notes.result | Sort-Object -Descending {[Long]$_}; $prev_note_id = $sorted_list[1]; $curr_note_id = $sorted_list[0]; $prev_note_data = Run-Json @{ action = 'notesInfo'; version = 6; params = @{ notes = @($prev_note_id); } }; Run-Json @{ action = 'updateNoteFields'; version = 6; params = @{ note = @{ id = $curr_note_id; fields = @{ Picture = $prev_note_data.result.fields.Picture.value; AdditionalNotes = $prev_note_data.result.fields.AdditionalNotes.value; } } } }; foreach ($tag in $prev_note_data.result.tags) { Run-Json @{ action = 'addTags'; version = 6; params = @{ notes = @($curr_note_id); tags = $tag; } } };"
Original ShareX Code (click here)
# (common begin)

function Run-Json {
    param( $json_map );

    $json = $json_map | ConvertTo-Json -Depth 5;
    $data = Invoke-RestMethod -Uri http://127.0.0.1:8765 -Method Post -ContentType `
        'application/json; charset=UTF-8' -Body $json;

    return $data;
};

# (common end)


$added_notes = Run-Json @{
    action = 'findNotes';
    version = 6;
    params = @{
        query = 'added:1';
    }
};

$sorted_list = $added_notes.result | Sort-Object -Descending {[Long]$_};

$prev_note_id = $sorted_list[1];
$curr_note_id = $sorted_list[0];


$prev_note_data = Run-Json @{
    action = 'notesInfo';
    version = 6;
    params = @{
        notes = @($prev_note_id);
    }
};

# copies picture & additional notes to current note
Run-Json @{
    action = 'updateNoteFields';
    version = 6;
    params = @{
        note = @{
            id = $curr_note_id;
            fields = @{
                Picture = $prev_note_data.result.fields.Picture.value;
                AdditionalNotes = $prev_note_data.result.fields.AdditionalNotes.value;
            }
        }
    }
};

# copies tags
foreach ($tag in $prev_note_data.result.tags) {
    Run-Json @{
        action = 'addTags';
        version = 6;
        params = @{
            notes = @($curr_note_id);
            tags = $tag;
        }
    }
};
Orthographic Variants: Fix Sentence and Frequency
Function Name:
fix_sent_and_freq
This script does the following:
- Sets the previous note's fields to the newest note's fields:
FrequencyStylizedSentenceSentenceReading
- Deletes the newest note
This is useful for when you want to add the the word within the Orthographic Variants dictionary. The Orthographics Variants dictionary is extremely useful for monolingual definitions, where dictionaries only contain entries for more kanjified words.
In practice, I've personally found numerous examples of this in everyday media, so this has helped me immensely.
Examples (to test the dictionary on)
「スペルド族への恐怖は恐らくこの世界に根づいているんだろう」
「ルーはたくさんあるので、今お代わりをお持ちしますね」
「ただ、一つだけ釘をささせてもらうけど…貴方がこれから何をするにしても、仕事は今まで通りこなしてもらうわよ?」
It is assumed that you have multiple popups enabled for monolingual definitions, so you can easily look up the word in the Orthographic Forms dictionary.
How to use
- Create a card from the word in the Orthographic Variants dictionary.
- Create a card from the word in original sentence.
- Run this script.
ShareX Script (click here)
-NoProfile -Command "function Run-Json { param( $json_map ); $json = $json_map | ConvertTo-Json -Depth 5; $data = Invoke-RestMethod -Uri http://127.0.0.1:8765 -Method Post -ContentType 'application/json; charset=UTF-8' -Body $json; return $data; }; $added_notes = Run-Json @{ action = 'findNotes'; version = 6; params = @{ query = 'added:1'; } }; $sorted_list = $added_notes.result | Sort-Object -Descending {[Long]$_}; $prev_note_id = $sorted_list[1]; $curr_note_id = $sorted_list[0]; $curr_note_data = Run-Json @{ action = 'notesInfo'; version = 6; params = @{ notes = @($curr_note_id); } }; Run-Json @{ action = 'updateNoteFields'; version = 6; params = @{ note = @{ id = $prev_note_id; fields = @{ FrequenciesStylized = $curr_note_data.result.fields.FrequenciesStylized.value; Sentence = $curr_note_data.result.fields.Sentence.value; SentenceReading = $curr_note_data.result.fields.SentenceReading.value; } } } }; Run-Json @{ action = 'deleteNotes'; version = 6; params = @{ notes = @($curr_note_id); } };"
Original ShareX Code (click here)
# (common begin)

function Run-Json {
    param( $json_map );

    $json = $json_map | ConvertTo-Json -Depth 5;
    $data = Invoke-RestMethod -Uri http://127.0.0.1:8765 -Method Post -ContentType `
        'application/json; charset=UTF-8' -Body $json;

    return $data;
};

# (common end)


$added_notes = Run-Json @{
    action = 'findNotes';
    version = 6;
    params = @{
        query = 'added:1';
    }
};

$sorted_list = $added_notes.result | Sort-Object -Descending {[Long]$_};

$prev_note_id = $sorted_list[1];
$curr_note_id = $sorted_list[0];


$curr_note_data = Run-Json @{
    action = 'notesInfo';
    version = 6;
    params = @{
        notes = @($curr_note_id);
    }
};

# copies frequency, sentence, sentence reading to previous note
Run-Json @{
    action = 'updateNoteFields';
    version = 6;
    params = @{
        note = @{
            id = $prev_note_id;
            fields = @{
                FrequenciesStylized = $curr_note_data.result.fields.FrequenciesStylized.value;
                Sentence = $curr_note_data.result.fields.Sentence.value;
                SentenceReading = $curr_note_data.result.fields.SentenceReading.value;
            }
        }
    }
};

# removes current note
Run-Json @{
    action = 'deleteNotes';
    version = 6;
    params = @{
        notes = @($curr_note_id);
    }
};
Settings / CSS for Renji's texthooker
I use the following stylizations to remove unnecessary padding within the document, and to behave more similarly to Anacreon's texthooker.
Settings:
| Setting | Value |
|---|---|
| Preserve Whitespace | |
| Remove Whitespace |
Custom CSS:
main > p {
  padding: 0rem !important;
}

main {
  padding-left: min(5%, 5rem) !important;
  padding-right: min(5%, 5rem) !important;
}

body > div > textarea {
  font-size: 24px !important;
}
Using a custom font (click here)
I set the font to be Noto Sans, but this will likely not work without downloading and installing the font first (e.g. from here). Below is the actual full CSS that I use in conjuction with the installed font:
Send text from Anki to your texthooker
This is a very quick hack to have text from Anki to appear on a websocket based texthooker.
This will be supported by default in jp-mining-note version 0.12.0.0.
Requires Python, written for Renji's texthooker.
Instructions (click here)
-
Save as
server.py:import asyncio import websockets CONNECTIONS = set() async def register(websocket): CONNECTIONS.add(websocket) try: async for message in websocket: print(f"server will now echo '{message}' to all other connections") connections = [c for c in CONNECTIONS if c != websocket] websockets.broadcast(connections, message) await websocket.wait_closed() finally: CONNECTIONS.remove(websocket) async def main(): async with websockets.serve(register, "localhost", 6678): await asyncio.Future() # run forever if __name__ == "__main__": asyncio.run(main()) -
Paste this on the back side of your Anki template:
<script> (() => { function sendText(id) { const sentEle = document.getElementById(id); if (sentEle !== null) { const sentence = sentEle.innerText.trim(); if (sentence.length > 0) { socket.send(sentence); } } } const url = "ws://localhost:6678"; const socket = new WebSocket(url); socket.onopen = (_e) => { sendText("full_sentence"); sendText("primary_definition_raw_text"); }; })(); </script> -
Replace
full_sentenceandprimary_definition_raw_textwith whatever id. - Install
websocketswith pip, i.e.pip3 install websockets - Change the web port on the texthooker page to
6678.
Whenever you want to connect Anki to the texthooker page:
- Run
server.py, i.e.python3 server.py - Ensure the web port is the same on the texthooker page, i.e.
6678 - Enable the websocket connection on the texthooker page.
Other Random Resources
Note
Most things here have been moved to the Setup: Everything Else page
Mikagu pitch accent alternatives
- migaku updated
- Fork of migaku to be updated for anki version 2.1.50+
- anki-jrp
- Completely stand-alone plugin from migaku with a completely different codebase
- Only does one thing: adds pitch accent colors (along with furigana)