Tips & Tricks
Custom Runtime Options
The runtime options file (default: config/jpmn_opts.jsonc)
can be specified at build time.
If you are working with modding the note, it is recommended that you create your own runtime options file, so you can edit the options at build time, while ensuring your runtime options file is up to date.
Here is how you can create and use a custom runtime options file:
-
Create the local runtime options file (e.g.
user_jpmn_opts.jsonc) -
Change
opts-pathunderconfig/config.py: -
(optional) Make the runtime options hard-coded to remove the file dependency during runtime, by changing the following setting in
config/config.py: -
Build and install the note as normal.
Note
If you are not using hard-coded runtime options and you have edited the contents of the local runtime options file, please run the installation script with
--install-optionsto replace the existing options file in Anki's media folder.
Field List Editing
This section describes import PSAs on what you should you if you want to edit the fields of the note (i.e. adding, removing, renaming, and moving).
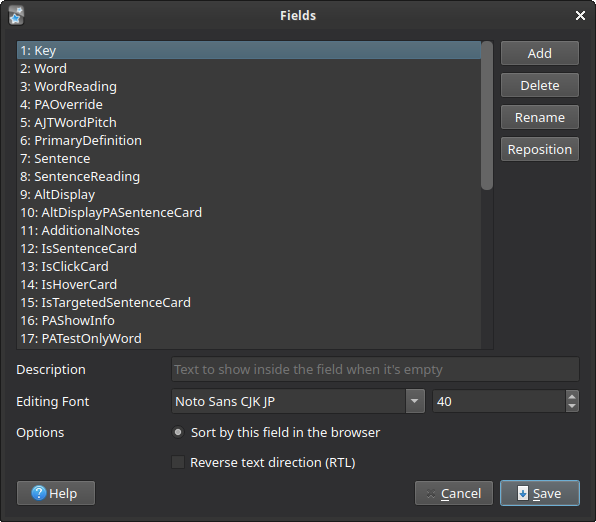
Fields editing in this context refers to the fields that you can edit
in the Fields (list) menu, found under (Main window) → Browse → Fields....
Note
If you never plan on updating the note, you can safely modify the field list to your heart's content, and ignore the rest of this section.
Installer details
The installer, when detecting a higher version, attempts to find and apply any
changes to the field list when necessary.
These changes are specified under tools/note_changes.py.
By default, the installer expects the field list to be completely un-changed after installation, and does many checks to verify this before and after installation.
Do not remove fields
One of the checks that the installer does is to ensure that all fields are present. This is a design choice to remove as many assumptions as possible, so that it is easier for the installer to update the note.
Note
This design choice may be changed in the future, but will likely remain until the end of the beta release.
If you want to remove a field, the best alternative is to do the following:
- Move the field below the
Commentfield, so the field is out of your way. - Whenever you decide to update the note to a new version,
run the installation script with the
--ignore-orderflag.
Do not rename fields
There is currently no way to let the installer know that you renamed a field. Therefore, you should not rename fields at all, as this will cause the initial field list check to fail.
If you are completely insistent on renaming a field, you must change all templates that uses the field to match your preferred field name.
Note
Similarily to the above, this may be changed in the future, but will likely remain until the end of the beta release.
How to add & reorder fields
If you want to add a field while preserving the existing field order upon updates,
add the field under the Comment field.
This is because the installer only checks the subset of fields above the Comment field,
when verifying correctness.
If you don't care about preserving field order,
you can simply add the field anywhere you want,
and then run the installation script with --ignore-order
whenever you want to update the note to a new version.
Javascript print statements
Anki doesn't come with a way to use console.log() normally, so I made one myself.
// global logger
LOGGER.error("message");
LOGGER.warn("message");
LOGGER.info("message");
LOGGER.debug("message");

// module-specific logger
const logger = JPMNLogger("module-name");
logger.error("message");
logger.warn("message");
logger.info("message");
logger.debug("message");
The above functions prints a message of the given log level to the info circle. To see the message, hover over the info circle.
To use the debug function, make sure that the debug option is set to true
in the javascript options.
Avoid asynchronous javascript features in Anki
Example Asynchronous Javascript
<script>

  // Example 1: normal asynchronous functions
  async function runMeAsynchronously() {
    // ...
  }

  // Example 2: promises
  function giveMeAPromise() {
    return new Promise((resolve, reject) => {
      setTimeout(() => {
        resolve("Success!");
      }, 1000);
    });
  }

  giveMeAPromise().then(() => {
    LOGGER.warn("The promise is complete!", unique=false);
  });

</script>

<!-- Example 3: anything wrapped in type="module" -->
<script type="module">
  // everything here is run asynchronously
  // ...
</script>
TODO reason:
- functions can be executed multiple times
- reproducible way: use example 2 on both the front/back side of the card, and switch sides quickly
- should be two warnings
- but worst case is for cases which I don't know how to reproduce
- rarely, asynchronous functions run more than once
- it seems like anki randomly loads the page twice, causing all asynchronous functions to also run twice
- including the async functions defined currently in modules like
kanji-hover - to cirumvent having their actions done twice, define the affected elements outside the asynchronous section
- the function still runs twice (so any side-effects of the function will still happen)
- however, other instances of the function should not work on the elements defined outside
- rarely, asynchronous functions run more than once
-
additionally, many modules require things to be loaded before the card is shown
- Anki displays the page only when all of the synchronous javascript is ran
- If these become asynchronous, the user will be able to see split-second changes to the layout as the javascript is running
- Two solutions to this:
- (1) To only show the page when specific asynchronous functions are complete, the entire page must be hidden,
with say, a
hiddenclass on the<body>element - Problem: if the main javascript fails, then you will get a blank page!
- making this approach very risky
- (2) Avoid asynchronous functions alltogether
- (1) To only show the page when specific asynchronous functions are complete, the entire page must be hidden,
with say, a
-
avoiding asynchronous features makes things more predictable within anki