Transfer Existing Notes
Overview
This section is dedicated to explaining how you can change other Anki cards into this note format.
Note
If you are simply importing old JPMN notes, updating JPMN will properly update all the notes in place. See this section instead.
Introduction
Unfortunately, there are so many card formats out there that it would be impossible to cover how to import from every format with detailed rigor. Instead, this section will give you some general tips on operations that will likely be common across most or all formats, as well as present a small example for Anime Cards.
Additionally, although you maybe able to import most of the card, it is unlikely that you will have complete 100% full functionality after importing the notes.
Prerequisites
Before doing anything that affects your Anki collection in a major way (for example, basically everything on this page), please make a complete backup of your collection.
Note
Transferring your previous notes shouldn't change your media files at all. However I recommend exporting with media just in case, so long as you have the disk space for it.
Anki
Anki provides a feature to switch between note types, without affecting scheduling information. To do this, follow the proceeding steps:
-
Head to the Card Browser window:
Main Window →
Browse -
Select all the cards that you want to switch.
Tip
Ctrl+A selects all cards in the browser.
-
Right click the selection →
Notes→Change Note Type...
Mapping Fields
Here is where I can't give specific advice, as every note is different. However, here are a few tips:
-
Map
WordtoKeyandWord.Your card likely doesn't have a separate
KeyandWordfield, and instead only contains oneWordfield. To import this correctly into JPMN, make sure JPMN'sKeyandWordfield are exactly your old card'sWordfield. -
The
WordReadingfield should ideally be a simplified furigana format. For example, if the word is 成り立つ, this field should be 「成[な]り 立[た]つ」. If you do not have any field that resembles this, use the kana reading (なりたつ) or true furigana (成り立つ), and continue with the steps below. -
Leave
AJTWordPitchandSentenceReadingempty.These fields can be empty as AJT Japanese can batch generate both word pitches and sentence furigana.
-
You may have some word pitch fields already in your card. Pitch accent graphs should be mapped to
PAGraphs, and pitch accent positions should be mapped toPAPositions. -
FrequencySortmaps to the frequency value used to sort by frequency, which works exactly the same as Marv'sFrequencyfield as documented in Marv's Resources page. -
If you have a field that stores the source of the media, I recommend mapping that to
AdditionalNotesorComment. -
I recommend not setting
FrequenciesStylizedto anything, even if you have a field for frequency lists1. -
When in doubt, look at the format in the example notes.
An example with Anime cards is shown below.
Example for Anime Cards (click here)
| jp-mining-note fields | Anime Cards Fields |
|---|---|
| Key | front |
| Word | front |
| WordReading | Reading |
| PAOverride | |
| PAOverrideText | |
| AJTWordPitch | |
| PrimaryDefinition | Glossary |
| PrimaryDefinitionPicture | |
| Sentence | Sentence |
| SentenceReading | |
| AltDisplayWord | |
| AltDisplaySentence | |
| AltDisplayPASentenceCard | |
| AltDisplayAudioCard | |
| AdditionalNotes | |
| Hint | |
| HintNotHidden | Hint |
| IsSentenceCard | |
| IsTargetedSentenceCard | |
| IsClickCard | |
| IsHoverCard | |
| IsHintCard | |
| IsSentenceFirstCard | |
| IsAudioCard | |
| PAShowInfo | |
| PATestOnlyWord | |
| PADoNotTest | |
| PASeparateWordCard | |
| PASeparateSentenceCard | |
| SeparateAudioCard | |
| SeparateSentenceAudioCard | |
| Picture | Picture |
| WordAudio | Audio |
| SentenceAudio | SentenceAudio |
| PAGraphs | Graph |
| PAPositions | |
| FrequenciesStylized | |
| FrequencySort | |
| PASilence | |
| WordReadingHiragana | |
| YomichanWordTags | |
| SecondaryDefinition | |
| ExtraDefinitions | |
| UtilityDictionaries | |
| CardCache | |
| Comment |
Note
Anything not specified should be set to (Nothing)
Batch Editing
After switching your notes, you will have to do the following few steps:
1. Correctly Formatting Sentence Field
If your sentence fields have been highlighted in a way that isn't using <b>,
then it will be incompatable with JPMN by default.
To see what the formatting of the sentence is,
view the raw HTML
of the Sentence field.
Sentences are usually formatted in one of three ways, as shown below:
If the tested content is highlighted with <b>, then it is already formatted correctly.
You can skip this step.
Example:
The note comes with a feature to automatically highlight the word within the sentence. However, this is an imperfect solution, and there is currently no easy way to add accurate highlighting to existing sentences.
As there is nothing to do, you can skip this step.
Example:
If the tested content is highlighted with something that isn't <b>,
then continue with the following instructions to change it.
Example:
Instructions to port formatted sentences (click here)
Note
You may want to make another backup before doing the following, just in case.
-
Determine how the sentence is formatted.
We will be using the above for this example. This example highlights the word using a
<span>with a custom color.The above is created from the following Yomichan fields:
-
Testing the Conversion.
In the Anki card viewer, select only one of your old notes.
Afterwards, right click the selection, and head over to:
Notes→Find and Replace... -
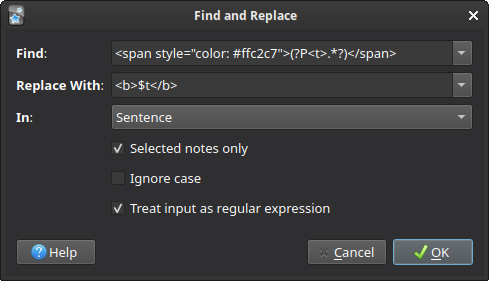
Setting the fields.
Set the
Findfield to something that can find your highlighted content. We will use the above as an example.It is extremely likely that you will have to change the
Findfield according to your note's sentence format.Field name Value Find: <span style="color: #ffc2c7">(?P<t>.*?)</span>Replace With: <b>$t</b>In: SentenceSelected notes only Checked () Ignore case Unchecked () Treat input as a
regular expressionChecked () Example image (click here)
-
Verify.
Press Ok, and then preview the card.
If the highlight is yellow (or blue on light mode), then it it was successful! Repeat steps 2 and 3, except select all of the affected notes instead of just one.
If it was not successful, you likely have to adjust the
Findfield. See here to see Anki's official documentation on regex.
2. Cleanup Other Fields
New in version 0.12.0.0 (latest version: 0.12.0.0-prerelease-11)
Run the following batch command:
Expected this batch command to take quite a bit of time, especially on collections containing many thousands of cards. This is because the batch command does quite a bit behind the scenes:
- Corrects
WordReadingif it is ruby text or regular text. - Backfills
WordReadingHiragana. - Backfills
PASilence. - Moves extra pictures in the
Picturefield into thePrimaryDefinitionPicturefield.- Note that this requires
beautifulsoup4installed (pip install beautifulsoup4). This is installed by default on Anki, so this will be properly ran if the batch command was ran with JPMN Manager.
- Note that this requires
- Moves extra audio in the
WordAudiofield into theSentenceAudiofield.
3. Batch Generate Pitch Accents and Sentence Furigana (optional)
This step requires the AJT Japanese addon to be correctly setup.
Although this step is technically optional,
pitch accents likely won't show for imported cards if you had nothing
to import into PAPositions. In that case, this step is highly recommended.
See here on how to backfill pitch accents and sentence furigana.
4. Backfill the FrequencySort Field (optional)
See here if you want to backfill the FrequencySort field.
Conclusion
If everything went smoothly, then you have successfully transferred your notes to the JPMN template. Enjoy reviewing your old cards with a new template!
Legacy Instructions
Most steps have now been combined all into the one cleanup batch command.
The legacy instructions for dealing with those steps individually are recorded
below just in case.
Legacy instructions: Batch Set PASilence Field
This will ensure all PASilence are filled correctly.
See here to understand what this field does.
This can be done with a batch command, or manually within Anki itself.
- Head to the Card Browser window.
-
Right click a card, and then head to:
Notes→Find and Replace... -
Set the fields to the following:
| Field name | Value |
|---|---|
| Find: | .* |
| Replace With: | [sound:_silence.wav] |
| In: | PASilence (IMPORTANT! Do not forget this field!) |
| Selected notes only | Unchecked () |
| Ignore case | Unchecked () |
| Treat input as a regular expression |
Checked () |
??? example "Example image <small>(click here)</small>"
<figure markdown>
[](assets/importing/bulk_add_silencewav.png)
</figure>
Legacy instructions: Correctly Formatting WordReading Field
Your WordReading field is likely formatted in one of three ways:
This is generated with the {furigana-plain} helper.
Example: 成[な]り 立[た]つ
If your WordReading field is formatted this way, then the WordReading field
is already formatted correctly. You can skip this step.
This is generated with the {furigana} helper.
Example:
成 り立 つ (HTML:<ruby>成<rt>な</rt></ruby>り<ruby>立<rt>た</rt></ruby>つ)
If your WordReading field is formatted this way,
it would be ideal to convert this into plain furigana
so the note can properly parse the field.
Instructions for converting furigana into plain furigana (click here)
- Head to the Card Browser window.
-
Right click a card, and then head to:
Notes→Find and Replace... -
Set the fields to the following:
| Field name | Value |
|---|---|
| Find: | <ruby>(<rb>)?(?P<kanji>.*?)(</rb>)?<rt>(?P<furigana>.*?)</rt></ruby> |
| Replace With: | $kanji[$furigana] (Keep the whitespace at the beginning!) |
| In: | WordReading |
| Selected notes only | Unchecked () |
| Ignore case | Unchecked () |
| Treat input as a regular expression |
Checked () |
This is generated with the {reading} helper.
Example: なりたつ
This means that your old cards only have a kana reading.
It would be ideal to have the WordReading as the kanji word with furigana.
You likely want the kanji word with the furigana, so the kanjis actually show
in the proper places.
Some examples include the kanji hover tooltip as well as
to the left of the picture field.
Instructions for converting kana readings into (plain) furigana (click here)
The solution provided below is imperfect, but passable.
This will format all of the WordReading fields to be Word[WordReading],
which means kana will repeated.
For example, a card with Word as 成り立つ, and WordReading as なりたつ,
will turn into:
To do this, run the following batch command:
The above will affect ALL notes.
If you instead want to affect certain notes, add the kanaonlyreading
tag to all affected notes, and then run the following batch command:
Legacy instructions: Batch set WordReadingHiragana Field
The following automatically fills out the WordReadingHiragana field.
Filling out the WordReadingHiragana field is optional but highly recommended.
This will enable the usage of Word Indicators
on existing cards.
To do this, run the following batch command:
-
FrequenciesStylizeduses a custom set of handlebars to store the frequency info in a way that css styles can be easily applied without javascript. This differs heavily from the{frequencies}helper provided by Yomichan. Mapping an existing field that stores frequencies using{frequencies}toFrequenciesStylizedwill result in incorrect display of data.There is currently no convenience function to convert it to the proper format.
Additionally, auto-generating frequency info (with the correct css, html, etc.) from arbitrary frequency lists does not seem trivial, and I currently provide no way of doing that (primarily because I'm not sure how to do it in the first place). If you know of a way or would like to help me out with doing this, please let me know! ↩