Anki Hotkeys (TODO)
This page serves as a collection of small Anki-related scripts primarily for the usage automating repetitive tasks with hotkeys.
It is separated into two main sections:
- ShareX Hotkeys: Hotkeys meant to be specifically used with media files generated from ShareX.
- Anki Hotkeys: General purpose hotkeys that act on the most recent card(s). Does not require media files to operate.
TODO demo
Note
The ShareX hotkeys are originally based off of Stegatxins0's Mining Setup. That was itself originally based off of AnimeCard's ShareX Setup.
ShareX Hotkeys
Windows users can use ShareX as a general purpose tool to automatically add images and audio to your most recently created card. There are two main hotkeys that this setup introduces:
- A screenshot hotkey
- An audio hotkey
Note
If you are using Linux, I recommend using ames instead of ShareX. Unfortunately, I'm not aware of a good solution for macOS users.
Feature Summary
- Audio is automatically normalized, and attempts to remove silence at the beginning of the audio.
- Images are saved as webp, to save disk space.
- The screenshot hotkey automatically adds the Window name as a tag to the card.
- Work with any note type, given that the correct flags are provided. By default, these work with jp-mining-note and AnimeCards.
- Instead of using PowerShell, this setup uses Python. Unfortunately, this is a little bit more difficult to setup for the average user, but using Python makes it much easier to develop and maintain the underlying scripts. Most people, including myself, know Python much more than PowerShell. Additionally, Python is generally cross platform and easy enough to setup on all operating systems.
ShareX Hotkeys Prerequisites
To use these hotkeys with ShareX, you must have the following installed:
- ShareX
- Python (Python 3.10 or above should work)
- Anki-Connect (You probably have this installed already if you're using Yomichan or jp-mining-note).
hotkey.py(see below)
The hotkey.py file can be downloaded in any of the following ways:
Option 1: JPMN Manager (click here)
If you have JPMN Manager installed, then this script is already available to you! It is located under the Anki folder:
Option 2: With git (click here)
For git users, simply clone the JPMN repository in somewhere you'll remember:
(repo root)/tools/hotkey.py.
Option 3: Manually (click here)
If none of the above works / you don't know what git is:
- Navigate to a folder you'll remember.
- Right click on some blank space, and then create a new text file (
New->Text Document). Name this text filehotkey.py. - Copy the script text into the new text file, and save (
Ctrl+S). TODO gif!
ShareX Screenshot Hotkey
-
Create the hotkey:
- Open ShareX, if you haven't already.
- On the sidebar to the left, click on
Hotkey settings.... (TODO image) - Within the Hotkey Settings window, click
Add. (TODO image) - Set the task to be
Screen capture->Capture region. - Set the hotkey value to whatever you want. For example,
F6.
(TODO gif)
-
Change the hotkey settings:
-
Click on the gear of your new
Capture Regionhotkey. (TODO image) -
Navigate to the
Tasktab.- Check
Override after capture settings() - Navigate to the capture tasks dropdown, and only have the following two items selected:
- Save image to file
- Perform actions (TODO image)
- Check
Override screenshots folder() - Click
Browseand select your Anki collection media location. Your media location can be found under: Tip: An easy way to navigate to this is by entering%APPDATA%in the path of the file browser. - To make it easier for you to remember what this hotkey does,
set the
Descriptiontoanki-screenshot. YourTasktab should now look something like this: (TODO image)
- Check
-
Navigate to the
Generaltab.- Check
Override general settings() (TODO image)
- Check
-
Navigate to the
General->Notificationstab.- Uncheck
Play sound after capture is made() - Uncheck
Play sound after task is completed() The sound on screenshot is removed so one can take a screenshot while recording the audio, without having the screenshot sound affect the recording. (TODO image)
- Uncheck
-
-
Add the
ffmpeg-to-webpaction:Explanation: This action saves the image as a webp image, to reduce file space while retaining the same quality. Unfortunately, as of writing this, ShareX does not support webp natively, so this action must be explicitly defined to save the image as a webp.
- Navigate to the
Actionstab. - Check
Override actions() - Click
Add.... -
A new window should pop up. Under this new window, fill out the following values:
- Navigate to the
-
Add the
card-add-imageaction:Explanation: This adds the image to the Anki card itself, using Anki-Connect and Python.
- Under the
Actionstab, clickAdd.... -
A new window should pop up. Under this new window, fill out the following values:
card-add-image action (click here)
- Name:
card-add-image - File path: (change the path to your exact path to
python.exe)- Your
python.exefile is usually underC:\PythonXX\python.exe, whereXXis the version number. If you can't find it, you can always search forpython.exeon the search bar, and then copying the full path of the file.
- Your
- Argument: (change the path to your exact path to
hotkey.py)- This is the
hotkey.pyfile from the prerequisites step.
- This is the
- Check
Hidden window()
(TODO image)
- Name:
- Under the
-
Test the hotkey: TODO
ShareX Screenshot Hotkey (NSFW)
For people using jp-mining-note or using Marv's Anki Card Blur, you might want to setup a different hotkey to specifically tag the card as NSFW when adding the image.
The following hotkey does the same as the above, while also adding the -NSFW tag to the card.
- Duplicate the screenshot hotkey above, and set the hotkey to something else (i.e. Shift+F6)
- Navigate to the
Actionstab.- Select
card-add-imageaction. - Change the
Argumentto the following:
- Select
TODO gif
ShareX Audio Hotkey
-
Create the hotkey:
- Open ShareX, if you haven't already.
- On the sidebar to the left, click on
Hotkey settings.... (TODO image) - Within the Hotkey Settings window, click
Add. - Set the task to be
Screen record->Start/Stop screen recording using pre configured region. - Set the hotkey value to whatever you want. For example,
F7.
(TODO gif)
-
Change the hotkey settings:
-
Click on the gear of your new
Start/Stop screen recording ...hotkey. (TODO image) -
Navigate to the
Tasktab.- Check
Override after capture settings() - Navigate to the capture tasks dropdown, and only have the following two items selected:
- Save image to file
- Perform actions
- Check
Override screenshots folder() - Click
Browseand select your Anki collection media location. Your media location can be found under: This should be the exact same folder as theanki-screenshothotkey. - To make it easier for you to remember what this hotkey does,
set the
Descriptiontoanki-audio.
Your
Tasktab should now look something like this: (TODO image) - Check
-
Navigate to the
Capturetab.- Check
Override capture settings() - Click
Select region, and select anywhere on the screen. This region would preferably not overlap with whatever you want to capture. If it does and you attempt to screenshot while using the audio hotkey, then the dotted region marked by ShareX will be captured as well. (TODO image)
- Check
-
Navigate to the
Capture->Screen recordertab. Within this, tab, click on theScreen recording options...button to open a new window.- Press the
Install recorder devicesbutton - Set
Video sourcetoNone - Set
Audio sourcetovirtual-audio-capturer - Set
Audio codectoOpus(This will be configurable later) - Click on the
Opustab right underneathAudio codec, and ensure the quality is set to128k. - Close this new window.
- Press the
-
-
Add the process audio action(s):
Explanation: This adds a ffmpeg call to normalize the audio and remove the beginning silence. Ideally, we would put these audio filters in the
Screen recording optionscustom commands box. Unfortunately, if placed there, the flags to normalize the audio ends up cutting off the audio. Therefore, this action is required to accurately run the desired audio filters.You have two options:
- Store as Opus. The Opus audio codec provides much better quality at lower bitrates (which saves a lot of space and makes syncing large collections faster). However, Opus is NOT compatible with AnkiMobile (iOS), Android 4, and AnkiWeb. If you use any of these, please use the 2nd option (MP3 audio) below.
- Store as MP3. Older and less efficient codec, but needed for compatibility with pretty much all devices.
Option 1. Opus (click here)
Explanation: ShareX does not natively support storing audio as .wav or .flac files. ShareX does not provide a simply way to copy a file. FFmpeg does not allow us to read and write to the exact same file. Finally, ShareX cannot run the audio filters in the
Screen recording optionscustom commands box, as mentioned above. With all these limitations, the only way to store it as opus while running the audio filters is to first convert the file to something else (we use .wav), and then re-convert it back to opus again while applying the audio filters.- Navigate to the
Actionstab. - Check
Override actions() -
Create the first action, by clicking
Add.... A new window should pop up. Under this new window, fill out the following values: -
Close the above
ffmpeg-process-audio-wavaction window. -
Create the second action, by clicking
Add.... A new window should pop up. Under this new window, fill out the following values:ffmpeg-process-audio-opus action (click here)
- Name:
ffmpeg-process-audio-opus - File path:
- Argument:
- Output file name extension:
- Check
Hidden window() - Check
Delete input file()
(TODO image)
- Name:
Option 2. MP3 (click here)
- Navigate to the
Actionstab. - Check
Override actions() - Click
Add.... -
A new window should pop up. Under this new window, fill out the following values:
ffmpeg-process-audio-mp3 action (click here)
- Name:
ffmpeg-process-audio-mp3 - File path:
- Argument:
- Output file name extension:
- Check
Hidden window() - Check
Delete input file()
(TODO image)
- Name:
-
Add the
card-add-audioaction:This adds the image to the Anki card itself.
- Under the
Actionstab, clickAdd.... -
A new window should pop up. Under this new window, fill out the following values:
card-add-audio action (click here)
- Name:
card-add-audio - File path: (change the path to your exact path to
python.exe) - Argument: (change the path to your exact path to
hotkey.py)- These paths should be the exact same as the
card-add-audioaction within theanki-screenshothotkey.
- These paths should be the exact same as the
- Check
Hidden window()
(TODO image)
- Name:
- Under the
Troubleshooting
-
Do NOT view the card in the card browser when running any script, because if you do, the affected fields may not update. Close the card browser before running the scripts.
However, you do not need to worry about this if you are running the python script with the
--enable-gui-browseflag.
Other Hotkeys
These are a set of scripts that may help you to prevent doing repetitive actions when adding notes.
Unlike the above, these scripts are not meant to be used with audio or picture files. Rather, they are stand-alone scripts that modify the most recent cards added.
These scripts are written in two formats:
one that works automatically with your usual ShareX setup,
and one in Python for cross-platform portability.
How-To: Running with ShareX
As shown above, ShareX has the ability to run custom user scripts. However, for ShareX to only run the script and do nothing else, the hotkey must be configured with steps shown below.
Steps
(TODO video)
- Under the main window, go to
Hotkey Settings, and add a new hotkey. - Click on the settings icon (of the newly added hotkey).
- In the
Tasktab (to the left):- Set:
TasktoScreen capture→Capture active window - Check
Override After Capture Tasks() - Under
After Capture, un-check everything, and check the following:Save Image to FilePerform ActionsDelete Locally
- Set:
- In the
Actionstab (to the left):- Check
Override Actions() - Uncheck all existing actions.
- Add a new action by clicking on
Add. - Set the following values of the action:
- File Path:
C:\PATH\TO\python.exe - Argument:
C:\PATH\TO\YOUR\HOTKEY\FILE\hotkey.py FUNCTION_NAME
- File Path:
- Check
Note
If you are adding multiple scripts with ShareX, instead of re-doing all of the
steps above, you can instead duplicate the keybind,
and simply set the Argument of the action to a different function name.
Explanation of the setup (click here)
The reason that the After Capture settings include Save Image to File
and Delete Locally is because without those settings, the Perform Actions
section doesn't appear to run.
Fortunately, the combination of Save Image to File
and Delete Locally means the hotkey does the following:
- Saves the image file
- Runs the custom script
- Deletes the image file
In other words, the image file is only temporarily created, and then deleted immediately after running the script. This effectively means that ShareX is only running the script whenever the keybind is used.
How-To: Running with Command Line
If you don't want to use ShareX, or you are not using Windows, you can simply run a python script with command line.
# Your python version should be 3.9 or higher.
# It may work for lower python versions, but I make no guarantee.
python3 /path/to/jp-mining-note/tools/hotkey.py FUNCTION_NAME
Examples (click here)
If you want to use these as keybinds, I will leave it up to you to determine how to do that (as there are too many different setups and programs that people can use to create keybinds). However, some tips for ShareX and AutoKey are given below.
How-To: Running with AutoKey (Not AutoHotKey)
If you are using AutoKey for Linux, it should be possible to do the following instead:
-
Go to:
Settings
→Configure AutoKey
→Script Engine
→User Module file
→ (add thejp-mining-note/toolsdirectory) -
Create a
scripttype hotkey, -
Within the script, run any function thusly:
Example:
Example with GUI:
Update Sentence with Clipboard
Function Name:
update_sentence
This script updates the sentence with the current clipboard (while preserving the bolded word),
and removes the SentenceReading field (of the newest note added).
This script is useful when Yomichan's parsed sentence does not match the recorded audio. This is also useful for when Yomichan's word parser doesn't match the word itself (steps shown below).
Note
After running this script, you must manually generate the SentenceReading field
if you want the furigana reading.
Of course, this can be done in bulk at any point,
as shown here.
How-To: Fix incorrectly-bolded words (click here)
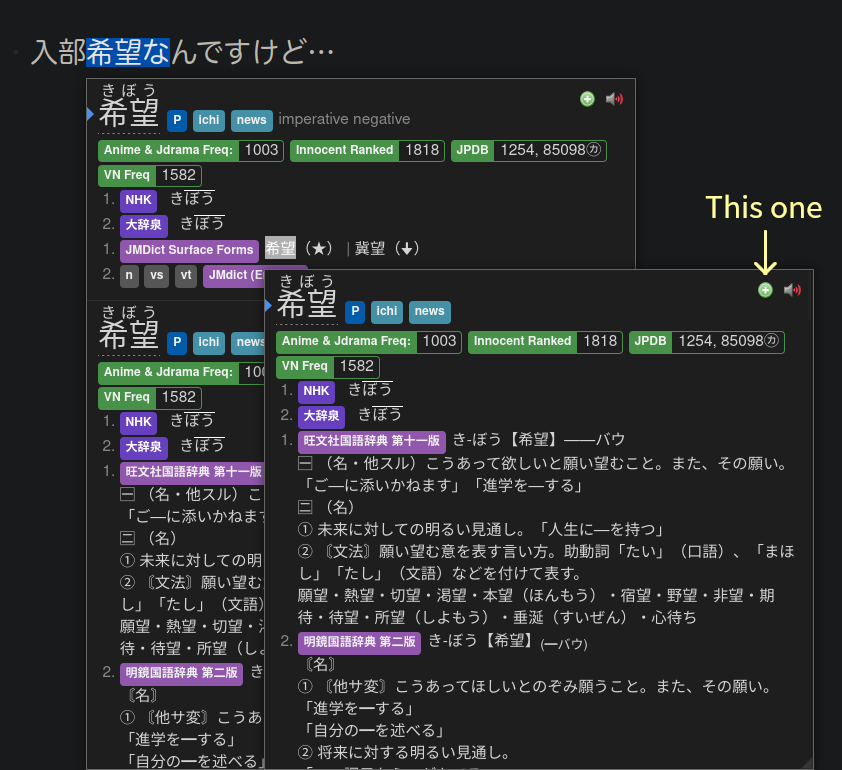
As an example, The target word 希望 in the sentence 「入部希望なんですけど…」 will be parsed by Yomichan as the following:
Within the original popup, you can add two versions of the word by default:
- The one with JMdict only. Adding this word will add the sentence with incorrect bolding.
- The one with everything else other than JMdict. Adding this word will have the correct bold, but will be missing some definitions.
To add the above sentence that solves both problems (no weird bold, and contains all definitions), do NOT add the word within the sentence. Instead, do the following:
-
Highlight over the header word itself (or the word in the orthographic forms dictionary), and add that word instead.
Demo (click here)
-
Copy the desired sentence.
-
Run this script.
Note
It is assumed that you have multiple popups enabled.
How the bolded word is preserved (click here)
The bolded word is preserved if the exact content within the bolded word is found within the clipboard, which should be almost always the case.
For example, assume the added sentence is the following:
As long as the clipboard contains the word 「偽者」, then the bold is preserved. For example, the following clipboard contents will preserve the bold:
TODO sharex_display(sharex.update_sentence)
Update AdditionalNotes with Clipboard
Function Name:
update_additional_notes
This script does the exact same thing as the above script, but with
AdditionalNotes instead of Sentence.
The tested word, if found, is also automatically highlighted.
This is useful to copy/paste context for the sentence (the surrounding lines around the sentence).
TODO sharex_display(sharex.update_additional_notes)
Copy from Previous Card
Function Name:
copy_from_previous
This script does the following:
- Set the
AdditionalNotesandPicturefield of the newest card to the previous (second-newest) card's fields. - Copies all the tags of the previous card.
This is useful for when you are adding more than one sentence with the same text box of a visual novel, as it prevents you from having to run the screenshot hotkey.
How to use
- Create a card from the first unknown word in the text box.
- Create a card from the second unknown word in the text box.
- Run this script.
TODO sharex_display(sharex.copy_from_previous)
Orthographic Variants: Fix Sentence and Frequency
Function Name:
fix_sent_and_freq
This script does the following:
- Sets the previous note's fields to the newest note's fields:
FrequencyStylizedSentenceSentenceReading
- Deletes the newest note
This is useful for when you want to add the the word within the Orthographic Variants dictionary. The Orthographics Variants dictionary is extremely useful for monolingual definitions, where dictionaries only contain entries for more kanjified words.
In practice, I've personally found numerous examples of this in everyday media, so this has helped me immensely.
Examples (to test the dictionary on)
「スペルド族への恐怖は恐らくこの世界に根づいているんだろう」
「ルーはたくさんあるので、今お代わりをお持ちしますね」
「ただ、一つだけ釘をささせてもらうけど…貴方がこれから何をするにしても、仕事は今まで通りこなしてもらうわよ?」
It is assumed that you have multiple popups enabled for monolingual definitions, so you can easily look up the word in the Orthographic Forms dictionary.
How to use
- Create a card from the word in the Orthographic Variants dictionary.
- Create a card from the word in original sentence.
- Run this script.
Deprecated Scripts
These contain powershell code for some scripts above. This powershell code has been replaced with Python scripts for easier maintainability
Screenshot and Clipboard Hotkey
Follow the steps for setting up the
screenshot hotkey,
and use this script in place of step 8's argument.
ShareX Script
-NoProfile -Command "function Run-Json { param( $json_map ); $json = $json_map | ConvertTo-Json -Depth 5; $data = Invoke-RestMethod -Uri http://127.0.0.1:8765 -Method Post -ContentType 'application/json; charset=UTF-8' -Body $json; return $data; }; $clipboard = (Get-Clipboard | where{$_ -ne \"\"}) -join \"<br>\"; $media_name = '$input' | Split-Path -leaf; $added_notes = Run-Json @{ action = 'findNotes'; version = 6; params = @{ query = 'added:1'; } }; $sorted_list = $added_notes.result | Sort-Object -Descending {[Long]$_}; $curr_note_id = $sorted_list[0]; $curr_note_data = Run-Json @{ action = 'notesInfo'; version = 6; params = @{ notes = @($curr_note_id); } }; $curr_note_sent = $curr_note_data.result.fields.Sentence.value; $result_clipboard = $clipboard; if ($curr_note_sent -match '<b>(?<bolded>.+)</b>') { $bolded = $matches['bolded']; $result_clipboard = $clipboard.replace($bolded, \"<b>$bolded</b>\"); }; Run-Json @{ action = 'updateNoteFields'; version = 6; params = @{ note = @{ id = $curr_note_id; fields = @{ Picture = \"<img data-editor-shrink=`\"true`\" src=`\"$media_name`\">\"; AdditionalNotes = $result_clipboard; } } } }; if ($media_name -match '(?<tag>.+)_.*') { $tag = $matches['tag']; } Run-Json @{ action = 'addTags'; version = 6; params = @{ notes = @($curr_note_id); tags = $tag; } };"
Original ShareX Code (click here)
# (common begin)

function Run-Json {
    param( $json_map );

    $json = $json_map | ConvertTo-Json -Depth 5;
    $data = Invoke-RestMethod -Uri http://127.0.0.1:8765 -Method Post -ContentType `
        'application/json; charset=UTF-8' -Body $json;

    return $data;
};

# (common end)


$clipboard = (Get-Clipboard | where{$_ -ne ""}) -join "<br>";

# gets only the file name
$media_name = '$input' | Split-Path -leaf;

$added_notes = Run-Json @{
    action = 'findNotes';
    version = 6;
    params = @{
        query = 'added:1';
    }
};

$sorted_list = $added_notes.result | Sort-Object -Descending {[Long]$_};

$curr_note_id = $sorted_list[0];


# attempts to bold the found word within the clipboard
$curr_note_data = Run-Json @{
    action = 'notesInfo';
    version = 6;
    params = @{
        notes = @($curr_note_id);
    }
};
$curr_note_sent = $curr_note_data.result.fields.Sentence.value;
$result_clipboard = $clipboard;
if ($curr_note_sent -match '<b>(?<bolded>.+)</b>') {
    $bolded = $matches['bolded'];
    # may not replace anything
    $result_clipboard = $clipboard.replace($bolded, "<b>$bolded</b>");
};


Run-Json @{
    action = 'updateNoteFields';
    version = 6;
    params = @{
        note = @{
            id = $curr_note_id;
            fields = @{
                Picture = "<img data-editor-shrink=`"true`" src=`"$media_name`">";
                AdditionalNotes = $result_clipboard;
            }
        }
    }
};

if ($media_name -match '(?<tag>.+)_.*') {
    $tag = $matches['tag'];
}

Run-Json @{
    action = 'addTags';
    version = 6;
    params = @{
        notes = @($curr_note_id);
        tags = $tag;
    }
};
Screenshot (only) Hotkey
This is the same as the above, but without setting the AdditionalNotes field to the current clipboard.
ShareX Script
-NoProfile -Command "function Run-Json { param( $json_map ); $json = $json_map | ConvertTo-Json -Depth 5; $data = Invoke-RestMethod -Uri http://127.0.0.1:8765 -Method Post -ContentType 'application/json; charset=UTF-8' -Body $json; return $data; }; $media_name = '$input' | Split-Path -leaf; $added_notes = Run-Json @{ action = 'findNotes'; version = 6; params = @{ query = 'added:1'; } }; $sorted_list = $added_notes.result | Sort-Object -Descending {[Long]$_}; $curr_note_id = $sorted_list[0]; Run-Json @{ action = 'updateNoteFields'; version = 6; params = @{ note = @{ id = $curr_note_id; fields = @{ Picture = \"<img data-editor-shrink=`\"true`\" src=`\"$media_name`\">\"; } } } }; if ($media_name -match '(?<tag>.+)_.*') { $tag = $matches['tag'] } Run-Json @{ action = 'addTags'; version = 6; params = @{ notes = @($curr_note_id); tags = $tag; } };"
Original ShareX Code (click here)
# (common begin)

function Run-Json {
    param( $json_map );

    $json = $json_map | ConvertTo-Json -Depth 5;
    $data = Invoke-RestMethod -Uri http://127.0.0.1:8765 -Method Post -ContentType `
        'application/json; charset=UTF-8' -Body $json;

    return $data;
};

# (common end)


# gets only the file name
$media_name = '$input' | Split-Path -leaf;

$added_notes = Run-Json @{
    action = 'findNotes';
    version = 6;
    params = @{
        query = 'added:1';
    }
};

$sorted_list = $added_notes.result | Sort-Object -Descending {[Long]$_};

$curr_note_id = $sorted_list[0];


Run-Json @{
    action = 'updateNoteFields';
    version = 6;
    params = @{
        note = @{
            id = $curr_note_id;
            fields = @{
                Picture = "<img data-editor-shrink=`"true`" src=`"$media_name`">";
            }
        }
    }
};

if ($media_name -match '(?<tag>.+)_.*') {
    $tag = $matches['tag']
}

Run-Json @{
    action = 'addTags';
    version = 6;
    params = @{
        notes = @($curr_note_id);
        tags = $tag;
    }
};
Audio Hotkey
This script works exactly the same as stegatxins0's version, except rewritten in a more readable format. If you already have the audio hotkey setup, there is no reason to change the old script.
To use this, follow the steps for setting up the
audio hotkey,
and use this script in place of step 14's Argument.
ShareX Script
-NoProfile -Command "function Run-Json { param( $json_map ); $json = $json_map | ConvertTo-Json -Depth 5; $data = Invoke-RestMethod -Uri http://127.0.0.1:8765 -Method Post -ContentType 'application/json; charset=UTF-8' -Body $json; return $data; }; $media_name = '$input' | Split-Path -leaf; $added_notes = Run-Json @{ action = 'findNotes'; version = 6; params = @{ query = 'added:1'; } }; $sorted_list = $added_notes.result | Sort-Object -Descending {[Long]$_}; $curr_note_id = $sorted_list[0]; Run-Json @{ action = 'updateNoteFields'; version = 6; params = @{ note = @{ id = $curr_note_id; fields = @{ SentenceAudio = \"[sound:$media_name]\"; } } } };"
Original ShareX Code (click here)
# (common begin)

function Run-Json {
    param( $json_map );

    $json = $json_map | ConvertTo-Json -Depth 5;
    $data = Invoke-RestMethod -Uri http://127.0.0.1:8765 -Method Post -ContentType `
        'application/json; charset=UTF-8' -Body $json;

    return $data;
};

# (common end)


# gets only the file name
$media_name = '$input' | Split-Path -leaf;

$added_notes = Run-Json @{
    action = 'findNotes';
    version = 6;
    params = @{
        query = 'added:1';
    }
};

$sorted_list = $added_notes.result | Sort-Object -Descending {[Long]$_};

$curr_note_id = $sorted_list[0];


Run-Json @{
    action = 'updateNoteFields';
    version = 6;
    params = @{
        note = @{
            id = $curr_note_id;
            fields = @{
                SentenceAudio = "[sound:$media_name]";
            }
        }
    }
};
Update Sentence with Clipboard
ShareX Script
-NoProfile -Command "function Run-Json { param( $json_map ); $json = $json_map | ConvertTo-Json -Depth 5; $data = Invoke-RestMethod -Uri http://127.0.0.1:8765 -Method Post -ContentType 'application/json; charset=UTF-8' -Body $json; return $data; }; $clipboard = (Get-Clipboard | where{$_ -ne ''}) -join ''; $added_notes = Run-Json @{ action = 'findNotes'; version = 6; params = @{ query = 'added:1'; } }; $sorted_list = $added_notes.result | Sort-Object -Descending {[Long]$_}; $curr_note_id = $sorted_list[0]; $curr_note_data = Run-Json @{ action = 'notesInfo'; version = 6; params = @{ notes = @($curr_note_id); } }; $curr_note_sent = $curr_note_data.result.fields.Sentence.value; $result_sent = ''; if ($curr_note_sent -match '<b>(?<bolded>.+)</b>') { $bolded = $matches['bolded']; $result_sent = $clipboard.replace($bolded, \"<b>$bolded</b>\"); } else { $result_sent = $clipboard; }; Run-Json @{ action = 'updateNoteFields'; version = 6; params = @{ note = @{ id = $curr_note_id; fields = @{ Sentence = $result_sent; SentenceReading = ''; } } } };"
Original ShareX Code (click here)
# (common begin)

function Run-Json {
    param( $json_map );

    $json = $json_map | ConvertTo-Json -Depth 5;
    $data = Invoke-RestMethod -Uri http://127.0.0.1:8765 -Method Post -ContentType `
        'application/json; charset=UTF-8' -Body $json;

    return $data;
};

# (common end)


$clipboard = (Get-Clipboard | where{$_ -ne ''}) -join '';

$added_notes = Run-Json @{
    action = 'findNotes';
    version = 6;
    params = @{
        query = 'added:1';
    }
};

$sorted_list = $added_notes.result | Sort-Object -Descending {[Long]$_};

$curr_note_id = $sorted_list[0];

$curr_note_data = Run-Json @{
    action = 'notesInfo';
    version = 6;
    params = @{
        notes = @($curr_note_id);
    }
};

$curr_note_sent = $curr_note_data.result.fields.Sentence.value;
$result_sent = '';

if ($curr_note_sent -match '<b>(?<bolded>.+)</b>') {
    $bolded = $matches['bolded'];
    # may not replace anything
    $result_sent = $clipboard.replace($bolded, "<b>$bolded</b>");
} else {
    # default
    $result_sent = $clipboard;
};


# updates current card with result_sent
Run-Json @{
    action = 'updateNoteFields';
    version = 6;
    params = @{
        note = @{
            id = $curr_note_id;
            fields = @{
                Sentence = $result_sent;
                SentenceReading = '';
            }
        }
    }
};
Update AdditionalNotes with Clipboard
ShareX Script
-NoProfile -Command "function Run-Json { param( $json_map ); $json = $json_map | ConvertTo-Json -Depth 5; $data = Invoke-RestMethod -Uri http://127.0.0.1:8765 -Method Post -ContentType 'application/json; charset=UTF-8' -Body $json; return $data; }; $clipboard = (Get-Clipboard | where{$_ -ne \"\"}) -join \"<br>\"; $added_notes = Run-Json @{ action = 'findNotes'; version = 6; params = @{ query = 'added:1'; } }; $sorted_list = $added_notes.result | Sort-Object -Descending {[Long]$_}; $curr_note_id = $sorted_list[0]; $curr_note_data = Run-Json @{ action = 'notesInfo'; version = 6; params = @{ notes = @($curr_note_id); } }; $curr_note_sent = $curr_note_data.result.fields.Sentence.value; $result_sent = ''; if ($curr_note_sent -match '<b>(?<bolded>.+)</b>') { $bolded = $matches['bolded']; $result_sent = $clipboard.replace($bolded, \"<b>$bolded</b>\"); } else { $result_sent = $clipboard; }; Run-Json @{ action = 'updateNoteFields'; version = 6; params = @{ note = @{ id = $curr_note_id; fields = @{ AdditionalNotes = $result_sent; } } } };"
Original ShareX Code (click here)
# (common begin)

function Run-Json {
    param( $json_map );

    $json = $json_map | ConvertTo-Json -Depth 5;
    $data = Invoke-RestMethod -Uri http://127.0.0.1:8765 -Method Post -ContentType `
        'application/json; charset=UTF-8' -Body $json;

    return $data;
};

# (common end)


$clipboard = (Get-Clipboard | where{$_ -ne ""}) -join "<br>";

$added_notes = Run-Json @{
    action = 'findNotes';
    version = 6;
    params = @{
        query = 'added:1';
    }
};

$sorted_list = $added_notes.result | Sort-Object -Descending {[Long]$_};

$curr_note_id = $sorted_list[0];

$curr_note_data = Run-Json @{
    action = 'notesInfo';
    version = 6;
    params = @{
        notes = @($curr_note_id);
    }
};

$curr_note_sent = $curr_note_data.result.fields.Sentence.value;
$result_sent = '';

if ($curr_note_sent -match '<b>(?<bolded>.+)</b>') {
    $bolded = $matches['bolded'];
    # may not replace anything
    $result_sent = $clipboard.replace($bolded, "<b>$bolded</b>");
} else {
    # default
    $result_sent = $clipboard;
};


# updates current card with result_sent
Run-Json @{
    action = 'updateNoteFields';
    version = 6;
    params = @{
        note = @{
            id = $curr_note_id;
            fields = @{
                AdditionalNotes = $result_sent;
            }
        }
    }
};
Copy from Previous Card
ShareX Script
-NoProfile -Command "function Run-Json { param( $json_map ); $json = $json_map | ConvertTo-Json -Depth 5; $data = Invoke-RestMethod -Uri http://127.0.0.1:8765 -Method Post -ContentType 'application/json; charset=UTF-8' -Body $json; return $data; }; $added_notes = Run-Json @{ action = 'findNotes'; version = 6; params = @{ query = 'added:1'; } }; $sorted_list = $added_notes.result | Sort-Object -Descending {[Long]$_}; $prev_note_id = $sorted_list[1]; $curr_note_id = $sorted_list[0]; $prev_note_data = Run-Json @{ action = 'notesInfo'; version = 6; params = @{ notes = @($prev_note_id); } }; Run-Json @{ action = 'updateNoteFields'; version = 6; params = @{ note = @{ id = $curr_note_id; fields = @{ Picture = $prev_note_data.result.fields.Picture.value; AdditionalNotes = $prev_note_data.result.fields.AdditionalNotes.value; } } } }; foreach ($tag in $prev_note_data.result.tags) { Run-Json @{ action = 'addTags'; version = 6; params = @{ notes = @($curr_note_id); tags = $tag; } } };"
Original ShareX Code (click here)
# (common begin)

function Run-Json {
    param( $json_map );

    $json = $json_map | ConvertTo-Json -Depth 5;
    $data = Invoke-RestMethod -Uri http://127.0.0.1:8765 -Method Post -ContentType `
        'application/json; charset=UTF-8' -Body $json;

    return $data;
};

# (common end)


$added_notes = Run-Json @{
    action = 'findNotes';
    version = 6;
    params = @{
        query = 'added:1';
    }
};

$sorted_list = $added_notes.result | Sort-Object -Descending {[Long]$_};

$prev_note_id = $sorted_list[1];
$curr_note_id = $sorted_list[0];


$prev_note_data = Run-Json @{
    action = 'notesInfo';
    version = 6;
    params = @{
        notes = @($prev_note_id);
    }
};

# copies picture & additional notes to current note
Run-Json @{
    action = 'updateNoteFields';
    version = 6;
    params = @{
        note = @{
            id = $curr_note_id;
            fields = @{
                Picture = $prev_note_data.result.fields.Picture.value;
                AdditionalNotes = $prev_note_data.result.fields.AdditionalNotes.value;
            }
        }
    }
};

# copies tags
foreach ($tag in $prev_note_data.result.tags) {
    Run-Json @{
        action = 'addTags';
        version = 6;
        params = @{
            notes = @($curr_note_id);
            tags = $tag;
        }
    }
};
Orthographic Variants: Fix Sentence and Frequency
ShareX Script
-NoProfile -Command "function Run-Json { param( $json_map ); $json = $json_map | ConvertTo-Json -Depth 5; $data = Invoke-RestMethod -Uri http://127.0.0.1:8765 -Method Post -ContentType 'application/json; charset=UTF-8' -Body $json; return $data; }; $added_notes = Run-Json @{ action = 'findNotes'; version = 6; params = @{ query = 'added:1'; } }; $sorted_list = $added_notes.result | Sort-Object -Descending {[Long]$_}; $prev_note_id = $sorted_list[1]; $curr_note_id = $sorted_list[0]; $curr_note_data = Run-Json @{ action = 'notesInfo'; version = 6; params = @{ notes = @($curr_note_id); } }; Run-Json @{ action = 'updateNoteFields'; version = 6; params = @{ note = @{ id = $prev_note_id; fields = @{ FrequenciesStylized = $curr_note_data.result.fields.FrequenciesStylized.value; Sentence = $curr_note_data.result.fields.Sentence.value; SentenceReading = $curr_note_data.result.fields.SentenceReading.value; } } } }; Run-Json @{ action = 'deleteNotes'; version = 6; params = @{ notes = @($curr_note_id); } };"
Original ShareX Code (click here)
# (common begin)

function Run-Json {
    param( $json_map );

    $json = $json_map | ConvertTo-Json -Depth 5;
    $data = Invoke-RestMethod -Uri http://127.0.0.1:8765 -Method Post -ContentType `
        'application/json; charset=UTF-8' -Body $json;

    return $data;
};

# (common end)


$added_notes = Run-Json @{
    action = 'findNotes';
    version = 6;
    params = @{
        query = 'added:1';
    }
};

$sorted_list = $added_notes.result | Sort-Object -Descending {[Long]$_};

$prev_note_id = $sorted_list[1];
$curr_note_id = $sorted_list[0];


$curr_note_data = Run-Json @{
    action = 'notesInfo';
    version = 6;
    params = @{
        notes = @($curr_note_id);
    }
};

# copies frequency, sentence, sentence reading to previous note
Run-Json @{
    action = 'updateNoteFields';
    version = 6;
    params = @{
        note = @{
            id = $prev_note_id;
            fields = @{
                FrequenciesStylized = $curr_note_data.result.fields.FrequenciesStylized.value;
                Sentence = $curr_note_data.result.fields.Sentence.value;
                SentenceReading = $curr_note_data.result.fields.SentenceReading.value;
            }
        }
    }
};

# removes current note
Run-Json @{
    action = 'deleteNotes';
    version = 6;
    params = @{
        notes = @($curr_note_id);
    }
};